K8s & OpenShift: Scaling & Resilience
Table of contents
Part 3 covered resource requests, limits, and how the kernel enforces them. This part covers what sits on top of that foundation: the mechanisms Kubernetes provides to scale workloads automatically and to keep them available when nodes drain, cluster upgrades run, or traffic spikes arrive unexpectedly.
Series navigation:
- Full guide: The Kubernetes & OpenShift Best Practices Guide (2026 Edition)
- Part 1 — The Big Picture
- Part 2 — Building workloads right
- Part 3 — Resource management deep dive
- Part 4 — Scaling & resilience (this post)
- Part 5 — Security
- Part 6 — Day-2 operations & GitOps
- Part 7 — Compliance (regulatory frameworks, audit logging, log retention)
Resilience is engineered, not assumed🔗
A Kubernetes cluster does not make workloads resilient by itself. It provides the primitives — replica sets, health probes, autoscalers, disruption budgets — but how those primitives are combined determines whether a service survives a node failure, a rolling update, or a traffic spike without dropping requests.
The two failure modes that hurt most in practice are not dramatic crashes. They are the silent ones: a service that cannot scale to meet demand and falls over under load, and a service that loses all its replicas during a routine node drain because nobody configured a disruption budget. Both are avoidable with standard Kubernetes tooling.
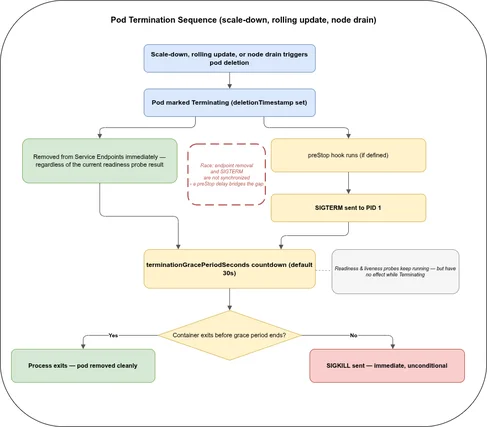
What happens when Kubernetes terminates a pod🔗
Scaling down, a rolling update, and a node drain all end the same way: a specific pod gets removed. That removal follows the same sequence regardless of which of the three triggered it:
deletionTimestampis set — the pod is nowTerminating.- Removed from Service Endpoints immediately, regardless of the current readiness probe result. A
Terminatingpod never receives new traffic from the Service again — but connections already established before removal are not cut off. They keep exchanging traffic until they close naturally or the container actually stops. - The
preStophook runs (if defined), then SIGTERM is sent to PID 1 — the graceful shutdown contract described in Part 2. Steps 2 and 3 are not synchronised: the endpoint removal and the SIGTERM are triggered by different controllers running concurrently, not sequentially. A shortpreStopdelay is what bridges that gap so in-flight connections do not get cut before load balancers catch up. - The
terminationGracePeriodSecondscountdown starts (default 30s, counted from when termination began, including any time spent inpreStop). The readiness and liveness probes keep running during this window, but neither does anything useful any more: the endpoint was already removed in step 2, and a liveness failure on a container that is already shutting down triggers no additional action. - If the container exits before the grace period ends, the pod is removed cleanly. If it has not exited by then, the kubelet issues SIGKILL — immediate, and not something the application gets a say in.
Horizontal Pod Autoscaler (HPA)🔗
The HPA adjusts the number of replicas in a Deployment, StatefulSet, or ReplicaSet based on observed metrics. It is the primary mechanism for handling variable load.
How it works🔗
The HPA controller runs on a configurable interval (default: 15 seconds) and compares current metric values against the configured targets. When metrics exceed the target, it scales up. When they fall below, it scales down — with a stabilisation window to prevent thrashing.
apiVersion: autoscaling/v2
kind: HorizontalPodAutoscaler
metadata:
  name: myapp
  namespace: myapp
spec:
  scaleTargetRef:
    apiVersion: apps/v1
    kind: Deployment
    name: myapp
  minReplicas: 2
  maxReplicas: 10
  metrics:
    - type: Resource
      resource:
        name: cpu
        target:
          type: Utilization
          averageUtilization: 70
  behavior:
    scaleDown:
      stabilizationWindowSeconds: 300
A few details that matter:
- HPA requires resource requests. The CPU utilisation percentage is calculated as
current usage / request. A pod without a CPU request has no baseline, and the HPA cannot compute utilisation — the HPA will report a missing metrics error and will not scale. minReplicas: 1is not a resilient default. With a single replica, any pod restart, node drain, or rolling update causes a period with zero available replicas. For any production-facing service,minReplicas: 2is the minimum that allows seamless restarts. Adding a second replica only helps if the application itself must be cluster-ready — no in-process locks, no state assumed to survive on a single instance — as covered in Part 2.- The scale-down stabilisation window (default 300 seconds) holds the current replica count for 5 minutes after a spike before scaling down. This prevents the HPA from scaling down immediately after a short burst and then scaling back up for the next one. Tune it to match the traffic patterns of the workload.
Scaling on custom metrics🔗
CPU and memory utilisation are useful starting points but are often poor proxies for actual load. A queue-based worker should scale on queue depth, not CPU. An API gateway should scale on requests per second, not memory.
The autoscaling/v2 API supports three metric types:
Resource— CPU and memory from the Metrics ServerPods— custom metrics averaged across all pods (e.g., requests per second per pod)External— metrics from outside the cluster (e.g., an SQS queue depth)
KEDA (Kubernetes Event-Driven Autoscaling) is a widely-used operator that extends HPA with ready-made scalers for over 60 event sources — Kafka topics, RabbitMQ queues, Redis streams, cloud storage events, Prometheus queries, and more. It manages the HPA object underneath, so it integrates with the existing scheduler and disruption budget machinery.
OpenShift ships its own metrics stack (OpenShift Monitoring, based on Prometheus) and provides a custom metrics adapter out of the box. Scaling on application Prometheus metrics via the HPA does not require installing a separate adapter on OpenShift — the platform wires it up as part of the standard monitoring stack.
Vertical Pod Autoscaler (VPA)🔗
The VPA watches a workload’s actual resource consumption over time and produces right-sized requests and limits recommendations. It operates in three modes:
| Mode | Behaviour |
|---|---|
Off | Collects data, produces recommendations, makes no changes |
Initial | Sets requests on pod creation only, does not update running pods |
Auto | Updates requests on running pods — requires pod restart |
apiVersion: autoscaling.k8s.io/v1
kind: VerticalPodAutoscaler
metadata:
  name: myapp-vpa
  namespace: myapp
spec:
  targetRef:
    apiVersion: apps/v1
    kind: Deployment
    name: myapp
  updatePolicy:
    updateMode: "Off"
Off mode is the safest way to use VPA: let it collect a week or two of production data, then read the recommendations and apply them to the Deployment manually. The recommendations appear in the VPA object’s status:
kubectl -n myapp describe vpa myapp-vpaIf HPA scales on CPU utilisation and VPA Auto simultaneously adjusts CPU requests, the two controllers fight: VPA changes the baseline the HPA uses for its calculation, causing oscillation. Use one or the other for a given metric — VPA for right-sizing during stable periods, HPA for runtime scaling on the same resource. Custom-metric HPA (scaling on RPS or queue depth) can coexist with VPA safely because they operate on different signals.
Cluster Autoscaler🔗
The Cluster Autoscaler (CA) operates at the node level. When pods cannot be scheduled because no node has sufficient capacity, CA adds a node to the pool. When nodes are consistently underutilised, CA removes them.
CA is not a substitute for HPA — it works in response to pending pods created by HPA scaling decisions. The typical flow: traffic spikes → HPA adds replicas → new pods are pending → CA adds a node → pods schedule. The gap between the HPA scaling decision and the new node becoming ready means that workloads must tolerate this lag.
What blocks node removal🔗
CA will not remove a node if doing so would violate constraints on the pods running there:
- Pod Disruption Budgets that would be violated by moving the pods elsewhere
- Pods with
local-storagevolumes —hostPathorlocalPersistentVolumes prevent eviction;emptyDirdoes not - Pods not managed by a controller — standalone pods cannot be rescheduled
- Pods with the annotation
cluster-autoscaler.kubernetes.io/safe-to-evict: "false"— explicit opt-out of CA eviction
If CA is not removing nodes it should be removing, checking for these blockers is the first diagnostic step.
Both OVH MKS and STACKIT SKE offer node-level autoscaling, but not as a cluster-autoscaler Deployment you install yourself the way the rest of this section describes. Autoscaling is a managed feature configured directly on the node pool object — an autoscale/min/max setting on OVH MKS’s NodePool, an equivalent field on STACKIT SKE’s node pool. The scaling logic itself runs on the provider’s side, not as a workload visible in your cluster; there is no cluster-autoscaler CRD or pod to find with kubectl get crd or kubectl -n kube-system get pods. Both platforms also offer spot (preemptible) node pools at significantly reduced cost — typically 60–90% less than on-demand pricing.
Neither platform provides an equivalent to the AWS Spot Interruption Handler, which pre-drains nodes before AWS reclaims them. On OVH MKS and STACKIT SKE, a spot node reclaim triggers a standard Kubernetes eviction: the node is cordoned and pods are evicted with respect to PDBs. The effective warning window is short and depends on the provider.
For workloads targeting spot node pools:
- Add a taint to the spot pool (e.g.
spot: "true":NoSchedule) and a matchingtolerationto the workloads allowed to run there — see “Taints and tolerations” later in this part for the underlying mechanism - Set
minReplicas: 2or higher — a spot pool can lose multiple nodes simultaneously - Ensure a PDB with
minAvailableormaxUnavailableis in place so evictions do not take the service to zero - Keep spot workloads stateless — spot interruption is a hard eviction, not a graceful shutdown
Pod Disruption Budgets🔗
A PodDisruptionBudget (PDB) tells Kubernetes the minimum availability that must be maintained during voluntary disruptions: node drains for maintenance, cluster upgrades, CA scale-down, or the kubectl drain command. Without a PDB, Kubernetes can terminate all replicas of a workload simultaneously during a drain — even if the workload has multiple replicas. The Kubernetes docs on disruptions cover the full voluntary-vs-involuntary distinction in detail.
apiVersion: policy/v1
kind: PodDisruptionBudget
metadata:
  name: myapp-pdb
  namespace: myapp
spec:
  minAvailable: 1
  selector:
    matchLabels:
      app: myapp
minAvailable vs maxUnavailable🔗
Both fields constrain the same thing from opposite directions. Use one, not both.
| Field | Meaning | When to use |
|---|---|---|
minAvailable: N | At least N pods must remain available | When the minimum healthy count matters (e.g., minAvailable: 1 for any non-zero coverage) |
minAvailable: "50%" | At least half the replicas must remain available | When relative coverage matters regardless of replica count |
maxUnavailable: N | At most N pods may be unavailable at a time | When disruption rate matters more than absolute count |
For a service with 3 replicas, minAvailable: 1 allows draining 2 pods at once. maxUnavailable: 1 allows only 1 at a time — slower drains but less capacity reduction. For critical services, minAvailable: "50%" scales automatically as replicas change.
A PDB with minAvailable: 1 on a Deployment with replicas: 1 prevents all voluntary evictions — CA cannot remove the node, the cluster cannot be upgraded gracefully, and node maintenance stalls. Either raise the Deployment to replicas: 2 (or minReplicas: 2 if it is HPA-managed) so there is a spare pod to evict, or accept that this workload will block voluntary disruptions entirely. For workloads that truly cannot run more than one replica, maxUnavailable: 1 (or no PDB at all) is the honest configuration.
OpenShift cluster upgrades drain nodes in sequence. A PDB that cannot be satisfied will stall the upgrade until it times out. OpenShift surfaces this in the cluster operator status and emits events on the PDB object. During an upgrade, oc get pdb -A and checking for ALLOWED DISRUPTIONS: 0 across all namespaces is a useful first diagnostic when an upgrade hangs.
Topology Spread Constraints🔗
Topology Spread Constraints distribute pods across failure domains — availability zones, nodes, or any custom topology key — with explicit control over how unevenly they can be distributed. They replace most use cases for pod anti-affinity with a cleaner, more predictable API.
topologySpreadConstraints is a Pod spec field — spec.template.spec.topologySpreadConstraints on a Deployment, StatefulSet, or DaemonSet, same as everywhere else in this series (see Part 2). It is not tied to any specific controller kind. See the Kubernetes docs on topology spread constraints for the full field reference.
spec:
  topologySpreadConstraints:
    - maxSkew: 1
      topologyKey: topology.kubernetes.io/zone
      whenUnsatisfiable: DoNotSchedule
      labelSelector:
        matchLabels:
          app: myapp
    - maxSkew: 1
      topologyKey: kubernetes.io/hostname
      whenUnsatisfiable: ScheduleAnyway
      labelSelector:
        matchLabels:
          app: myapp
The two constraints in this example:
- Hard zone spread — pods must be spread across availability zones with at most 1 pod difference between zones. If the scheduler cannot achieve this, the pod stays pending (
DoNotSchedule). This prevents all replicas from landing in a single zone. - Soft node spread — the scheduler tries to avoid running two pods of this workload on the same node, but will do so if needed (
ScheduleAnyway). This limits the blast radius of a single node failure without making scheduling impossible.
maxSkew defines the maximum allowed difference in pod count between any two topology domains. maxSkew: 1 with 3 zones and 6 pods yields 2-2-2. With 7 pods it allows 3-2-2 (skew of 1) but not 4-2-1 (skew of 3).
The labelSelector in the topology spread constraint must match the pods it applies to — the same labels used in the Deployment’s pod template. A mismatch means the controller does not count the pods correctly and spread is not enforced. When spread does not work as expected, check that the label selector matches what is actually on the pods.
Pod anti-affinity🔗
Pod anti-affinity is the older mechanism for controlling pod placement relative to other pods. It is more verbose than topology spread constraints and harder to tune, but remains useful for one specific case: “do not run this pod on the same node as that specific other pod type.”
Like topologySpreadConstraints, affinity.podAntiAffinity is a Pod spec field — spec.template.spec.affinity on whichever controller kind wraps the pod, not something tied to Deployments specifically. See the Kubernetes docs on affinity and anti-affinity for the full field reference.
spec:
  affinity:
    podAntiAffinity:
      preferredDuringSchedulingIgnoredDuringExecution:
        - weight: 100
          podAffinityTerm:
            labelSelector:
              matchLabels:
                app: myapp
            topologyKey: kubernetes.io/hostname
preferredDuringScheduling (soft) attempts to avoid co-location but schedules anyway if necessary. requiredDuringScheduling (hard) refuses to schedule if the constraint cannot be met — which can leave pods permanently pending if there are not enough nodes.
For zone and node spread, topology spread constraints are the cleaner approach. Anti-affinity remains useful for cross-service constraints: “the cache pod should not share a node with the database pod.”
Taints and tolerations🔗
Topology spread constraints and anti-affinity control placement from the workload’s side — preferences and distribution. Taints and tolerations are the node’s side of the same problem: exclusion. A taint on a node repels pods by default; a toleration on a pod is the explicit exception that allows it to schedule there anyway. This is the mechanism behind dedicating node pools to specific workloads — spot nodes, GPU nodes, or any pool that should not silently accumulate arbitrary pods — already referenced earlier in this part for spot node pools and again in Part 6 for node-pool rotation.
# on the node (set once, e.g. when creating the node pool)
kubectl taint nodes node-1 spot=true:NoSchedule
# on the pod — the matching toleration
spec:
tolerations:
- key: spot
operator: Equal
value: "true"
effect: NoScheduleThree effects control what happens to pods that do not tolerate the taint:
| Effect | Behaviour |
|---|---|
NoSchedule | New pods without a matching toleration are not scheduled. Pods already running are unaffected. |
PreferNoSchedule | The scheduler tries to avoid placing non-tolerating pods there, but will if there is no other option. |
NoExecute | New pods are not scheduled, and pods already running without a matching toleration are evicted. |
Taints and tolerations only work as a repel mechanism — a toleration permits scheduling onto a tainted node, it does not attract a pod there. Getting pods onto a specific set of nodes still needs nodeSelector or node affinity in addition to the toleration; without it, a pod that tolerates the taint might just as easily land on an entirely different, untainted node. See the Kubernetes docs on taints and tolerations for the full field reference.
Which one do I need?🔗
Topology spread constraints, pod anti-affinity, and taints/tolerations all answer the same underlying question — where should this pod be scheduled — from three different angles:
| Mechanism | Decides based on | Direction | Reach for it when… |
|---|---|---|---|
| Topology spread constraints | The pod’s own replica distribution across a topology domain (zone, node, custom key) | Balances evenly | You need “no more than N pods difference between zones/nodes” for one workload’s own replicas |
| Pod anti-affinity | The presence of other, specific pods | Repels from co-location | You need “this workload must not share a node with that other workload” (e.g. cache vs. database) |
| Taints and tolerations | A property of the node, independent of any pod | Repels by default, tolerated as the exception | You need to dedicate a set of nodes to specific workloads and keep everything else off (spot pool, GPU pool, isolated tenant) |
The first two are configured on the pod and reason about other pods. Taints/tolerations are configured on the node and reason about node eligibility — which is also why, unlike the other two, they need a companion nodeSelector or node affinity rule to actually pull matching pods onto the tainted nodes rather than just permitting it. The three are not mutually exclusive: a production setup commonly combines all three — spread across zones, keep two specific services apart, and dedicate a node pool to a workload type.
Scheduling order: filter first, then score🔗
There is no priority order between the three where one “overrides” another — the kube-scheduler evaluates them in two separate phases for every scheduling decision:
- Filter. Every node is checked against every hard constraint:
NoSchedule/NoExecutetaints without a matching toleration,requiredDuringSchedulingIgnoredDuringExecutionnode or pod affinity, andwhenUnsatisfiable: DoNotScheduletopology spread. This is a logical AND — a node must pass all of them to remain a candidate. A pod staysPendingif no node passes every filter. - Score. Only nodes that survived filtering are ranked.
PreferNoScheduletaints,preferredDuringSchedulingIgnoredDuringExecutionaffinity, andScheduleAnywaytopology spread each contribute a weighted score; the scheduler sums them and picks the highest. By default,TaintTolerationcarries weight 3 in this sum, whileNodeAffinity,InterPodAffinity, andPodTopologySpreadeach carry weight 2 — a deliberate signal that an explicit taint preference should influence placement more than the others, without any of them being a hard override.
In practice: a hard rule from any of the three (DoNotSchedule, NoSchedule/NoExecute, required...) can make a pod unschedulable regardless of what the other two prefer. Among the nodes that remain, the soft preferences are added together, not applied in sequence.
Rolling updates — the update strategy as a resilience tool🔗
Rolling updates are the mechanism by which new versions reach production without downtime. The two parameters that control the update pace are part of the resilience story:
strategy:
  type: RollingUpdate
  rollingUpdate:
    maxUnavailable: 0
    maxSurge: 1
strategy is a field on the Deployment object (spec.strategy). StatefulSets use the similarly named but differently-behaved spec.updateStrategy instead — partition-based rather than surge-based, since ordered pod identity makes maxSurge meaningless for most stateful workloads.
| Setting | Behaviour | Trade-off |
|---|---|---|
maxUnavailable: 0, maxSurge: 1 | One extra pod starts before any old pod stops | Zero-downtime but requires capacity for one extra pod |
maxUnavailable: 1, maxSurge: 0 | One old pod stops before any new pod starts | No extra capacity needed, brief reduction to N-1 replicas |
maxUnavailable: 0, maxSurge: 25% | Starts 25% new pods at once before removing old ones | Faster rollout, needs 25% extra capacity |
A surge-based rollout (maxSurge > 0) only works if every resource the pod depends on can exist twice at once, even briefly — the new pod running side by side with the old one. That is not automatically true for a PersistentVolume. An RWO (ReadWriteOnce) volume, covered in Part 2, can only be attached read-write to one node at a time. If the new surge pod lands on a different node than the old one — which the topology spread constraints or anti-affinity described earlier in this part make more likely — its PVC cannot attach until the old pod releases the volume, and the old pod will not terminate until the new pod passes its readiness probe. The rollout deadlocks: FailedAttachVolume events on the new pod, no progress either way. RWX (ReadWriteMany) volumes do not have this problem. For a Deployment bound to an RWO volume, strategy.type: Recreate is the safer choice: it terminates the old pod and releases the volume before creating the new one, at the cost of a brief gap with zero running replicas.
The rolling update only terminates old pods after new pods pass their readiness probe. This is what makes the readiness probe from Part 2 so important at this layer: without a properly configured readiness probe, Kubernetes has no way to know whether the new pod is actually ready to serve traffic before it starts sending requests to it.
If a new version fails its readiness probe consistently, the rollout stalls with the new pod in NotReady state — it does not proceed and old pods are not terminated. This is the correct behaviour: a broken rollout is paused, not silently completed. Use kubectl rollout status to monitor and kubectl rollout undo to revert.
Next: Part 5 covers security — RBAC, Pod Security Admission (and OpenShift’s SCCs), network policies, and supply-chain controls.
Partly used sources — specific references for this part:
- Best practices for running apps in Kubernetes — Part 1 — Palark (2021)
- Best practices for running apps in Kubernetes — Part 2 — Palark (2021)
- Kubernetes Best Practices I Wish I Had Known Before — Pulumi (2025, updated 2026)
- Disruptions — kubernetes.io
- Topology Spread Constraints — kubernetes.io
- Assigning Pods to Nodes — Affinity and anti-affinity — kubernetes.io
- Taints and Tolerations — kubernetes.io
- kube-scheduler — kubernetes.io
- Scheduler Configuration — kubernetes.io
- Kubernetes production readiness checklist — learnkube.com (2026)
- Kubernetes Best Practices for Safer, More Reliable Clusters — Komodor (2026)